Example: Using the AWS IoT Core Client SL Library
Product: CODESYS IIOT Libraries SL
Description
The AWS IoT Core Client SL Example.project example shows how to use the AWS IoT Core Client SL library.
The AWSDeviceShadow application shows how to write and read the "Device Shadow".
The AWSPubSub application shows how to use the included function blocks to publish and subscribe to messages.
The AWS_JSON_DeviceShadow application shows how to use the JSONBuilder to update the "Device Shadow".
Getting Started
Installing a client certificate
A client certificate is used to authenticate a device on AWS IoT Core. The client certificate can be generated via the AWS web interface, downloaded, and then installed on the corresponding device.
A CSR file (Certificate Signing Request) is generated on the controller. This file is then used to generate a certificate.
For instructions about how to do this, see the following section.
The certificate and private key are created, downloaded, and installed on the device via AWS.
For more information, see: Import of client certificates with private key
Creating the certificate with a CSR file
The CODESYS Security Agent package must be installed on your computer.
For more information, see: CODESYS Security Agent
You need an AWS account.
Create a (
Thing) device inAWS IoT Corevia the web interface.You can view and manage your (
Things) devices in the navigation side panel underManage > All Devices > Things.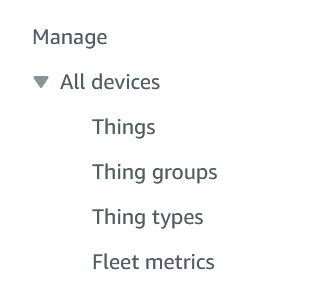
In the sample project, open the
AWSPubSubapplication.Set the endpoint to the
AWSIoTClient.sHostnameinput.Example:
xxxxxxxxxxxxxxx.iot.yyyyyyyy.amazonaws.com)You can find your endpoints in the navigation side panel under
Connect > Domain configurations. You can also create a new endpoint there if necessary.Set the previously assigned device name ("Name of thing") to the
AWSIoTClient.sClientIdinput.Use the
AWSIoTClient.sCertCNPrefixinput if theClientIdis identical to the host name. This prevents loading an incorrect certificate (for example fromWebServer).Tip
If the input is not displayed, then execute the Reset Pins command.
Example:
sCertCNPrefix := 'AWSClient', sClientId := 'MyHostname';The "Common Name" (CN) of the certificate is
AWSClient@MyHostnameDownload the application to the controller and start it.
The application will now try to establish an encrypted connection to AWS, but it will fail due to the missing certificate. Nevertheless, this setup experiment is relevant in the following.
Set the
xEnableflag of theAWSIoTClienttoTRUE.In the device editor, select the PLC Shell tab.
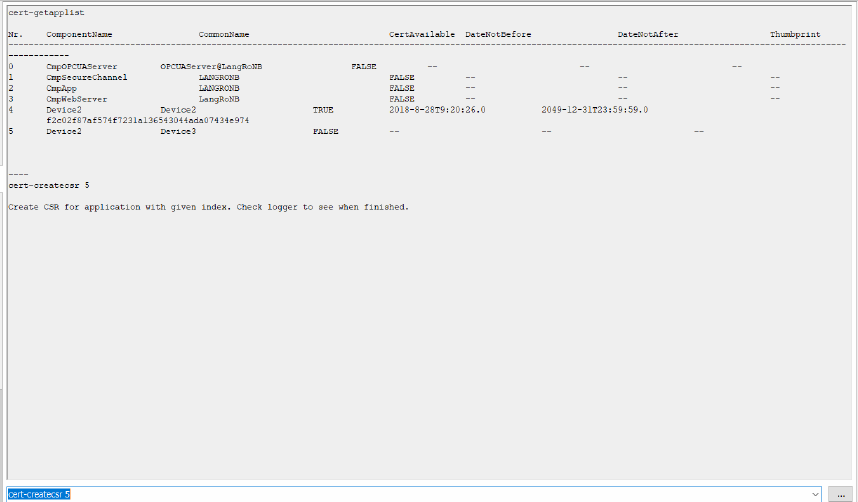
Run the following command:
cert-getapplistA component with the specified device name and number is displayed in the output.
Note: The device is not displayed if you have not previously attempted to establish a connection to AWS (Step 5).
Run the following command:
cert-createcsr <number> encoding=Base64Replace
<number>with the number obtained in Step 8. Generating the CSR file may take a few seconds.In the device editor under the Log category, a corresponding message is output after generation.
In the device editor, select the Files tab.
Copy the CSR file from the
cert/exportdirectory to the local file system.
You can now use the generated CSR file to create a certificate via the AWS web interface.
You can access a management overview of all your certificates in the navigation side panel via
Security > Certificates.Use the
Add certificate > Create certificatecommand to create a new certificate with the exported CSR file.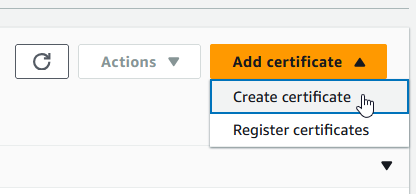
Download the certificate and the root certificate.
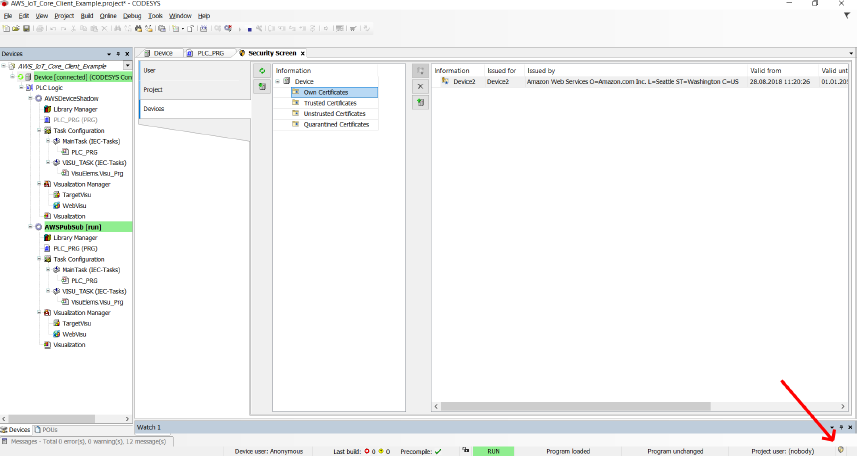
In CODESYS, click View → Security Screen menu command.
Under Own Certificates, install your client certificate.
Under Trusted Certificates, install the root certificate.
Click Online → Reset Cold and start the application.
A new connection attempt by the
AWSIoTClientfunction block will now set theAWSIoTClient.xConnectedToBrokeroutput toTRUE.The connection is established successfully.
Important
When you uninstall a certificate created via CSR from a controller, it will no longer work if you reinstall it.
The reason for this is that information on the private key is removed during uninstallation, in which case you need to create a new certificate for the device.
System requirements and restrictions
Programming system | CODESYS Development System (version 3.5.18.0 or higher) |
Runtime system | CODESYS Control Win (version 3.5.18.0 or higher) Note: Use the free |
Add-on components | - |
Additional requirements | AWS Account (AWS IoT Core) |
Note
 DOWNLOAD projects